A Guide To Nightmare Before Christmas Pumpkin Painting: Transforming Ordinary Gourds Into Tim Burton Magic
A Guide to Nightmare Before Christmas Pumpkin Painting: Transforming Ordinary Gourds into Tim Burton Magic
Related Articles: A Guide to Nightmare Before Christmas Pumpkin Painting: Transforming Ordinary Gourds into Tim Burton Magic
Introduction
In this auspicious occasion, we are delighted to delve into the intriguing topic related to A Guide to Nightmare Before Christmas Pumpkin Painting: Transforming Ordinary Gourds into Tim Burton Magic. Let’s weave interesting information and offer fresh perspectives to the readers.
Table of Content
A Guide to Nightmare Before Christmas Pumpkin Painting: Transforming Ordinary Gourds into Tim Burton Magic

The arrival of autumn brings with it the enchanting spirit of Halloween, and what better way to celebrate than with a touch of Tim Burton’s whimsical darkness? The Nightmare Before Christmas, with its unique blend of Halloween and Christmas, offers a rich source of inspiration for pumpkin carving and painting, allowing individuals to transform ordinary pumpkins into captivating works of art. This guide delves into the world of Nightmare Before Christmas pumpkin painting, exploring techniques, materials, and inspiration for creating unique and memorable Halloween decorations.
The Appeal of Nightmare Before Christmas Pumpkin Painting
The Nightmare Before Christmas, a beloved stop-motion animated film, holds a special place in the hearts of many. Its iconic characters, haunting yet endearing, provide a distinct aesthetic that resonates with the Halloween spirit. Pumpkin painting, inspired by the film, offers a unique opportunity to:
- Embrace the film’s unique aesthetic: The film’s distinct visual style, characterized by its gothic charm and vibrant colors, translates beautifully onto pumpkins.
- Express creativity: The process allows for personal interpretation and artistic expression. Whether it’s recreating a specific character or crafting a unique composition, pumpkin painting encourages individual creativity.
- Celebrate Halloween: Pumpkin painting, inspired by the film, offers a unique and engaging way to decorate for Halloween, adding a touch of whimsy and darkness to any space.
- Engage in a family activity: Pumpkin painting provides a fun and creative activity for families and friends to enjoy together, fostering a shared experience and creating lasting memories.
Essential Materials for Nightmare Before Christmas Pumpkin Painting
Before embarking on the creative journey, it’s essential to gather the necessary materials:
- Pumpkins: Choose pumpkins of varying sizes and shapes, depending on the desired design.
- Paints: Acrylic paints are ideal for pumpkin painting due to their quick drying time and vibrant colors.
- Brushes: Select a variety of brush sizes and shapes to achieve different effects, from fine details to broad strokes.
- Paint thinner: Use a paint thinner, such as water or mineral spirits, to clean brushes and thin paints.
- Pencil: A pencil is useful for sketching the design onto the pumpkin before painting.
- Tracing paper: Tracing paper can be used to transfer designs from paper to the pumpkin surface.
- Scissors: Scissors are necessary for cutting out stencils if using them.
- Stencils: Pre-made or custom-made stencils can be used to create detailed designs.
- Varnish (optional): A varnish can be applied to protect the paint and enhance its longevity.
Techniques for Nightmare Before Christmas Pumpkin Painting
The following techniques can be employed to create stunning Nightmare Before Christmas-inspired pumpkin designs:
- Freehand painting: This technique involves directly painting onto the pumpkin without using stencils or guides. It allows for greater freedom of expression and detail.
- Stenciling: Stencils can be used to create precise designs, especially for intricate details or repeated motifs.
- Sponge painting: Using a sponge, apply paint in a dabbing motion to create textured effects.
- Brushstrokes: Utilize different brushstrokes to create varying textures and effects. For example, using a dry brush can create a rough, textured look, while using a wet brush can create smooth, blended colors.
- Color layering: Apply multiple layers of paint to create depth and dimension.
- Blending: Blend colors together to create smooth transitions and gradients.
- Adding details: Use fine brushes or a toothpick to add intricate details, such as eyes, mouths, and other facial features.
- Embellishments: Add embellishments such as glitter, sequins, or other decorative elements to enhance the design.
Inspiration for Nightmare Before Christmas Pumpkin Painting
The Nightmare Before Christmas offers a wealth of inspiration for pumpkin painting:
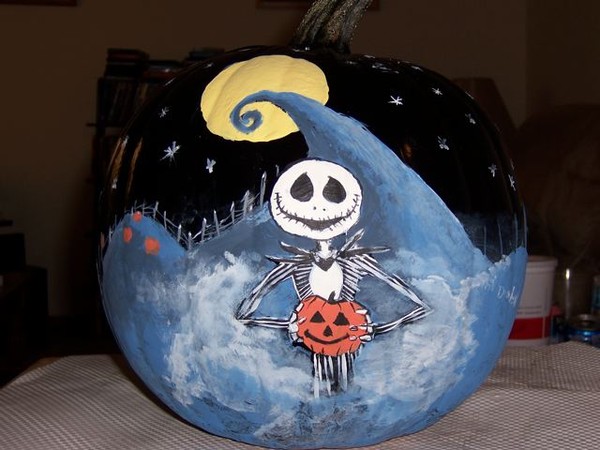
- Characters: Characters like Jack Skellington, Sally, Oogie Boogie, and Zero are iconic and easily recognizable, offering a perfect starting point for design inspiration.
- Scenes: Replicate scenes from the film, such as Jack’s arrival in Christmas Town or the Halloween Town graveyard.
- Symbols: Incorporate symbols from the film, such as the Christmas Town star, the Halloween Town moon, or the clock tower.
- Color palette: Use the film’s distinct color palette, characterized by dark blues, greens, purples, and oranges, to create a cohesive and visually striking design.
FAQs about Nightmare Before Christmas Pumpkin Painting
Q: What is the best way to prepare a pumpkin for painting?
A: Start by cleaning the pumpkin with soap and water, then dry it thoroughly. If desired, use sandpaper to smooth out any rough spots.
Q: How long does it take for acrylic paint to dry on a pumpkin?
A: Acrylic paint dries relatively quickly, usually within an hour or two. However, it’s best to allow the paint to dry completely before handling the pumpkin.
Q: Can I use other types of paint besides acrylics?
A: While acrylics are the most commonly used paint for pumpkins, other types of paint, such as tempera or craft paint, can also be used. However, these paints may require longer drying times.
Q: How can I make my pumpkin painting last longer?
A: Applying a sealant or varnish to the finished pumpkin can protect the paint and enhance its longevity.
Q: What if I make a mistake while painting?
A: Mistakes can happen! If you make a mistake, use a damp cloth to wipe away the paint before it dries.
Tips for Nightmare Before Christmas Pumpkin Painting
- Start with a sketch: Sketch the design onto the pumpkin using a pencil before applying paint.
- Use a light touch: Apply paint in thin layers, allowing each layer to dry completely before adding the next.
- Clean your brushes: Clean your brushes thoroughly after each use to prevent paint from drying and hardening.
- Experiment with different techniques: Don’t be afraid to experiment with different techniques to find what works best for you.
- Have fun! Pumpkin painting is a creative and enjoyable activity, so relax and enjoy the process.
Conclusion
Transforming a simple pumpkin into a Nightmare Before Christmas masterpiece requires a blend of creativity, technique, and inspiration. By following these guidelines, individuals can create unique and captivating pumpkin decorations that capture the essence of Tim Burton’s whimsical world. Whether it’s a recreation of a beloved character or a personalized interpretation of the film’s themes, Nightmare Before Christmas pumpkin painting offers a delightful and engaging way to celebrate Halloween and showcase artistic talent.


Closure
Thus, we hope this article has provided valuable insights into A Guide to Nightmare Before Christmas Pumpkin Painting: Transforming Ordinary Gourds into Tim Burton Magic. We thank you for taking the time to read this article. See you in our next article!